

How To Cycle An Axolotl Tank
If you've followed my Beginner's Guide on How To Set Upwardly An Axolotl Tank, y'all've already bought and installed everything you need to welcome your outset pet axolotl.
But, there's yet one VERY Of import step you lot need to complete: ensure that the tank water is just right! When it comes to axolotls, water quality is possibly THE most important aspect of your axolotl tank.
The concluding step in the setup procedure is to bike your tank. Y'all MUST make sure that your tank is cycled BEFORE introducing your pet axolotl.
In this guide, I volition embrace:
- Nitrogen bike of water.
- Optimal water parameters for an axolotl tank.
- Axolotl tank cycling.
- Water testing.
- H2o conditioning.
If this sounds helpful to you lot, keep on reading below. Also, delight consider sharing this guide on social media as it might assist other people out too. Thank you!
Table of Contents
- Nitrogen Cycle of H2o
- Optimal Water Parameters For Axolotls
- Temperature
- pH Levels
- Ammonia & Ammonium (NH3/NH4+)
- Nitrite (NO2-)
- Nitrate (NO3-)
- Cycling Your Axolotl Tank
- Items You Will Demand To Cycle Your Tank
- How To Wheel Your Tank
- Regular Water Testing & Maintenance
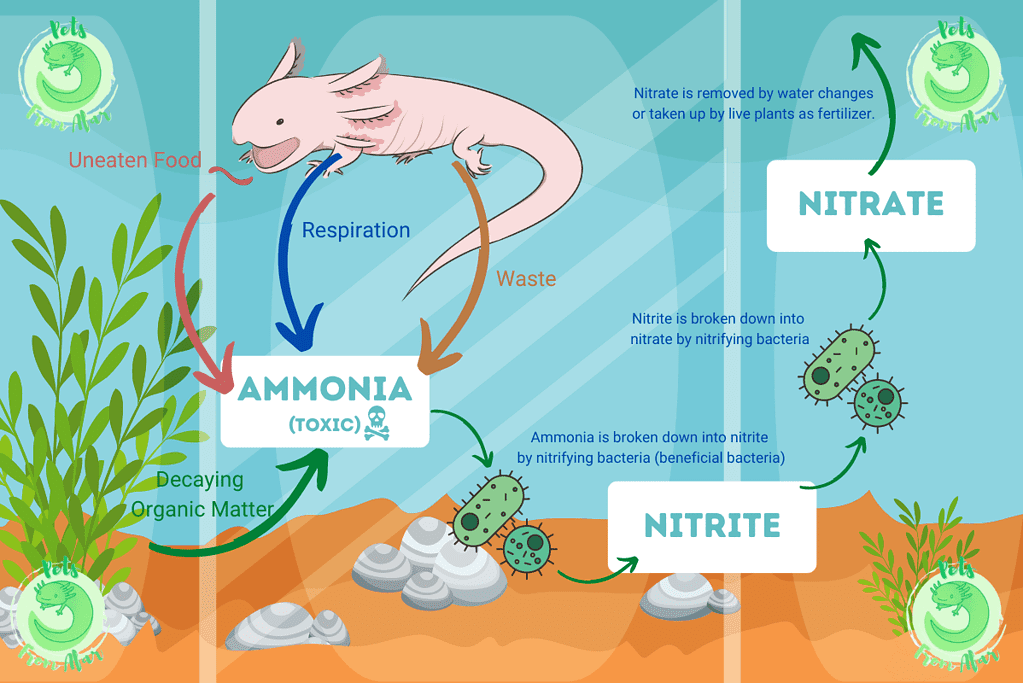
Nitrogen Cycle of H2o
In your quest for optimal water chemistry, you will exist able to call on an important ally: beneficial bacteria – and nitrifying leaner in item.
Nitrifying bacteria enable what'south known as the nitrogen cycle of water. In summary, benign leaner break downwards the most toxic compounds in the h2o (ammonia) into less toxic compounds (nitrates), which are then either removed from the water via h2o changes or absorbed every bit nutrients by alive aquatic plants.
The nitrogen wheel of water is a topic in and of itself, too lengthy to cover in total in this article. Bank check out this resource for more details.
Optimal Water Parameters For Axolotls
The main parameters you will demand to examination and control are listed out below. I've also included target values for axolotl tank water to put you on the right path.
Temperature
Optimal h2o temperature range: lx to 64 degrees Fahrenheit (xvi to 18 degrees Celsius).
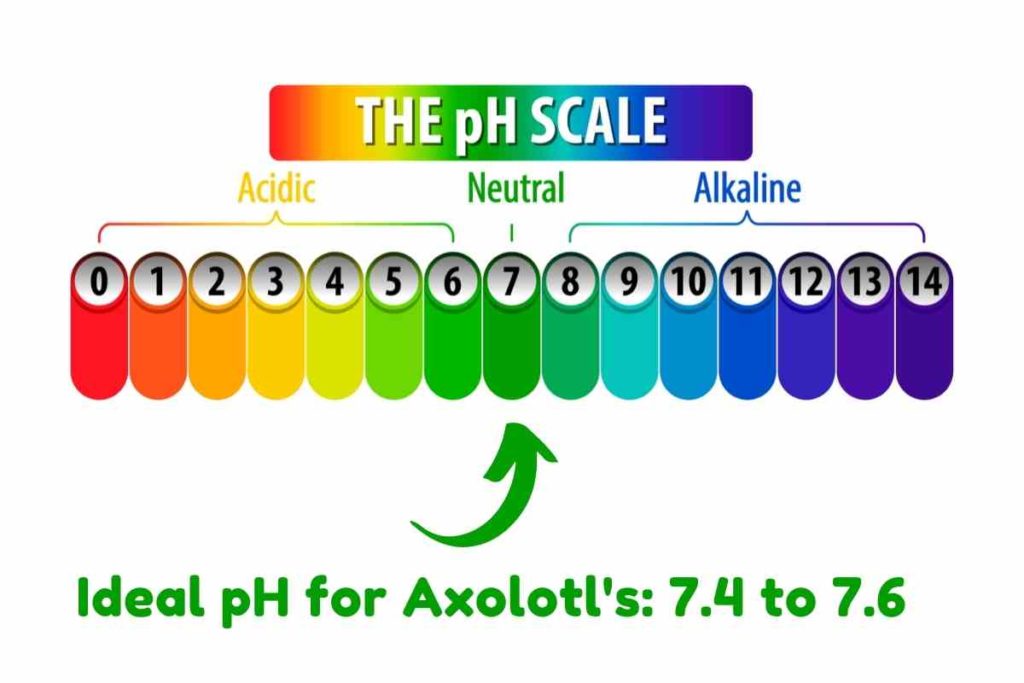
pH Levels
Optimal pH range: 7.4 – seven.6
pH is measured on a scale of 0 to 14 where 0 is the most acidic, xiv is the most basic/alkaline, and vii is neutral.
As you tin come across, axolotls prefer a very slightly basic water pH.
Ammonia & Ammonium (NH3/NH4+)
Optimal ammonia concentration: 0 ppm (ppm stands for parts per meg)
Ammonia is the major waste production of axolotls. It's excreted through the animal's gills, urine, and feces and is besides a by-product of decomposing uneaten nutrient or organic matter (expressionless skin, axolotl slime, plants, etc.).
Ammonia is extremely toxic to axolotls.
Nitrite (NO2-)
Optimal nitrite concentration: 0 ppm
Nitrite is produced when nitrifying bacteria intermission downward the ammonia in your tank. Nitrite is highly toxic to axolotls, even at low concentrations.
Nitrate (NO3-)
Maximum nitrate concentration: 5 to twenty ppm
Nitrate is produced when nitrifying leaner further intermission downwardly the nitrite in your tank. Nitrate accumulates in your tank and is mildly toxic to axolotls. Nitrates are removed through regular water changes.
Cycling Your Axolotl Tank
At this phase in your build, you need to cycle your tank. Cycling your axolotl tank kicks off the growth of the nitrifying bacteria mentioned in a higher place. In that location are different ways to bike a tank, some more complicated than others.
The method I will explain below is the most beginner-friendly method. It's also sometimes called "instant cycling", as the procedure is accelerated when compared with more than traditional cycling protocols.
The instant cycling method relies on "seeded media". Seeded media are filter materials such as sponges, meshes, bio-assurance, or chemic rings that are pre-saturated with large quantities of beneficial leaner which will immediately kick off the nitrogen cycle in your tank.
To feed these bacteria, liquid ammonia is added to the water. The bacteria will feed off the ammonia and proliferate into colonies big enough to balance the water chemistry once your axolotl is introduced.
Items You Will Need To Bike Your Tank
Here's a summary of the items you will demand to instant wheel your tank.
Note: They're included in the supply list summary department above. You tin receive this list directly to your email past signing upwards below (the email likewise includes a printable PDF version).
- Fully Gear up Tank (meet department 2), including functioning filter.
- Water Conditioners
- Seeded Media – if available.
- Bacteria Booster
- Liquid Ammonia Solution
- H2o Test Kit
How To Cycle Your Tank
Step 1: Condition Water
Status your tank water using h2o conditioners. Make sure to follow the instructions on the canteen. Conditioning will help dechlorinate the water and accommodate the pH levels.
If the water has been in your tank for several days already, then a lot of the chlorine will have evaporated already and then you won't need to use every bit much conditioner.
Stride two: Add Seeded Media (Optional)
If you've managed to get your easily on seeded media, insert the seeded media into your filter and switch on the filter. Otherwise, skip to footstep 3.
It'due south worth noting that you may not exist able to find seeded media or media that's 100% compatible with the exact filter model you have. You may need to arrange the seeded media so that it fits into or onto the specific filter model in your tank.
Alternatively, you tin can simply submerge the seeded media adjacent to your filter inlet or outlet, and so that the water cycles through it indirectly.
Step 3: Add together Quick Start Bacteria Booster
Add the API Quick Start bacteria booster to the tank water, following the instructions on the container.
Step 4: Add Liquid Ammonia
Add the liquid ammonia solution to the water in quantities such as to achieve a concentration of 2 to 4 ppm.
You volition demand to carefully read the instructions hither to brand sure you're dosing the solution out correctly for the book of h2o in your tank.
Step 5: Permit Your Tank Cycle
Let your tank cycle for vii to 10 days by keeping the filter and calorie-free switched on. The light will provide an extra boost to the bacteria's growth.
During this footstep, the leaner from the seeded media and bacteria booster will begin to break down the ammonia, kicking off the nitrogen cycle. In doing so, nitrites and nitrates will begin to appear in your h2o during testing.
Step half dozen: Test Your Water & Monitor Parameters
Using your test kit, have daily readings of the ammonia, nitrite, and nitrate concentrations. Keep a record of these and then you lot can estimate their evolution over time.
Once the nitrogen cycle kicks off, the following will happen:
- Ammonia levels will drib (a good sign, it'due south existence broken down past the bacteria).
- Nitrite levels will increment (nitrite is a by-product of ammonia breakdown).
- Nitrite levels will drib, and nitrate levels will increase (the nitrite is itself broken down by the bacteria, resulting in nitrate).
You lot will know that your tank is fully cycled once y'all achieve the following parameters:
- Ammonia: 0 ppm
- Nitrite: 0 ppm
- Nitrates: 5 to 20 ppm
Step 7: Adjust Ammonia
The aim at this phase of the cycling process is to achieve a concentration of nitrates of 5 to 20 ppm. Once you've striking this milestone, you'll know that the bacteria colonies are large enough to break downward the waste that your axolotl will produce once introduced.
If the nitrate concentration is any lower, your bacteria colonies are even so as well small. In this case, you will demand to keep feeding them to make them grow bigger. And how do you do that? Well, it's simple: you lot go along calculation ammonia to the water – in small-scale doses.
Initially, ammonia concentrations will spike (try not to exceed 2 to 4 ppm). Then, ammonia levels should offset to gradually turn down. As ammonia drops, nitrites will ascent. And finally, as nitrites drop, nitrates will rise.
If ammonia levels are not dropping, and so the nitrogen cycle isn't happening. Practise non add more ammonia, it won't help. The issue most likely lies with the bacteria. In certain cases it simply takes time, and you may need to give them a few extra days to "wake up" and do their work. If time doesn't resolve the issue, you may want to consult with an practiced every bit there may be other bug preventing the bike from kick off.
Once your tank is cycled, you are finally ready to buy your axolotl and introduce it to the habitat you've designed and built for information technology.
Regular Water Testing & Maintenance
You've probably already introduced your axolotl to its new home at this stage. It'due south getting used to its new environs, and you and it are getting used to each other.
To go along your axolotl in good shape, you will need to exercise a couple of things on a regular basis:
- Feed it (cheque out our article What Do Axolotl Eat?).
- Test its water.
- Clean its tank ( check out our article How To Clean An Axolotls Tank)
Source: https://petsfromafar.com/how-to-cycle-an-axolotl-tank/
0 Response to "How To Cycle An Axolotl Tank"
Post a Comment